
Getting Started with the Harmony A2 Player
This guide will walk you through setup, network requirements, troubleshooting, and frequently asked questions to help you get started quickly and efficiently.
What’s in the Box?
Your package includes:
- Harmony A2 Media Player
- Power Adapter
- Ethernet Cable (4 feet)
- HDMI Cable (Optional for visuals)
- 3.5mm Aux to RCA Audio Cable (3 feet)
- Remote Control with Batteries and Tether
- Quick Start Guide & LED Reference Guide
Initial Setup
Connecting Harmony to a sound system
NOTE: Your device may not function as intended if different adapters and cables are used. Please only use the adapters and cables that are included with Mood Harmony.
- Please refer to the Regulatory and Safety Information sheet included with your Harmony before proceeding.
- Adjust the volume of your display or speaker system down completely (off). Then, if necessary, power off and remove your existing media player.
- Unpack your Harmony device and place it in an area that allows for adequate ventilation space.
- Connect the cables in this order: Note:The Harmony player does not support Bluetooth playback at this time.
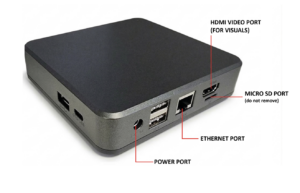
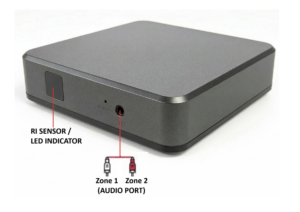
- Step A: To connect your Harmony to your sound system plug the 3.5mm Aux cable into the Harmony A/V jack, then the red/white RCA connectors to the corresponding audio zone(s) for your speaker system Traditionally, the white cable is for Zone 1 audio and the red cable is for Zone 2.
- Step B: Mood recommends you use the Ethernet cable included to connect Harmony to your network: plug one end of the Ethernet cable into the network port of the Harmony player and the other end into your network router/switch. Once Harmony is connected to the internet, the Network light will remain solid green. If your LED Indicator is anything but “solid on”, please refer to the Network Setup section below for additional network setup instructions.
- Step C: Plug the power adapter into the back of Harmony and plug it in to an ‘always on’ outlet – Harmony is energy efficient and optimized to run 24/7, so do not use an outlet that’s controlled by a switch or electrical timer. Be sure to only use the power adapter provided with Harmony.
- Step D: Turn on your speaker system and increase the master volume in small increments until you reach your desired listening level. Please note that you may need to adjust your speaker volume to match the level you are accustomed to. Due to normal differences between any previous music player and your new Harmony player you may need to try different volume settings. Set at 100% for both AUX and HDMI output, 0% for everything else.
- Place the batteries in the back of the Harmony remote control. For more information about the Harmony remote control, see our Remote Control Guide.
- After 1-3 minutes, your music and/or visual content should start to play automatically. If it doesn’t, check your sound system / display to make sure it’s turned on and/or the volume is up at a hearable level.
______________________________________________________________________
Network Setup
Wired Ethernet Setup (Recommended)
If available, the easiest and most reliable way is to connect Harmony to your Internet router using the Ethernet cable included in the box.
- Connect the provided Ethernet cable into the Ethernet port on the back of Harmony and to your internet router.
- Once Harmony is successfully connected to the internet, the LED Indicator will remain solid indicating no action required. (For advanced setups that require a Static IP address or Proxy, see the WiFi and Advanced Wired Setup below), see the LED Control Guide for troubleshooting.
WiFi and Advanced Wired Setup
You will need to download the Mood Harmony app on the Google Play Store or Apple App Store.
After installing the Mood Harmony app on your mobile device, follow the instructions in the app to get connected. Watch our How to Access Network Settings Video for more information.
Once Harmony is connected to the internet, the LED Indicator will remain “solid on”.
If your LED Indica tor is anything other than green, see the LED Control Guide for troubleshooting.
LED Status Guide
Your Harmony A2 media player features a blue LED indicator near the remote control sensor to provide real-time status updates.
|
LED Indicator |
Status |
Action Required |
|
Solid On |
Normal Operation |
No action required |
|
Solid Off |
Device Powered Off |
Check power connection |
|
Solid Blink (2s On, 0.5s Off) |
Hotspot Mode |
Connect to device’s hotspot to complete network setup |
|
Fast Blink (0.5s On, 0.5s Off) |
Offline |
Check network cables or WiFi connection |
|
Slow Blink (0.5s On, 2s Off) |
Limited Connectivity |
Verify firewall settings and ensure required ports are open |
|
Double Blink – Pause |
Connected but Content Stopped |
Ensure player is in playback mode, check schedule settings |
|
Triple Blink – Pause |
Audio Muted / Unplugged |
Check volume settings and audio connections |