Getting Started with Harmony Music
The Harmony Music player comes pre-loaded with some of Mood’s core music programs to best set the perfect mood in your business.
Need getting started instructions for the Harmony Music MAVP-B2 player?
Included with Your Mood Harmony Player:
- Remote Control with Batteries and Tether
- Power Adapter
- Ethernet Cable (4 feet) and HDMI Cable
- 3.5mm Aux to RCA Audio Cable (3 feet)
- Welcome Letter and LED Reference Guide
Initial Setup
Connecting Harmony to a sound system
NOTE: Your device may not function as intended if different adapters and cables are used. Please only use the adapters and cables that are included with Mood Harmony.

- Please refer to the Regulatory and Safety Information sheet included with your Harmony before proceeding.
- Adjust the volume of your display or speaker system down completely (off). Then, if necessary, power off and remove your existing media player.
- Unpack your Harmony device and place it in an area that allows for adequate ventilation space.
- Connect the cables in this order: Note:The Harmony player does not support Bluetooth playback at this time.
- Step A: To connect your Harmony to your sound system plug the 3.5mm Aux cable into the Harmony A/V jack, then the red/white RCA connectors to the corresponding audio zone(s) for your speaker system. There is no need to use the yellow RCA connector. The white cable is for Zone 1 audio and the red cable is for Zone 2.
- Step B: Mood recommends you use the Ethernet cable included to connect Harmony to your network: plug one end of the Ethernet cable into the network port of the Harmony player and the other end into your network router/switch. Once Harmony is connected to the internet, the Network light will remain solid green. If your Network light is anything other than green, please refer to the Network Setup section below for additional network setup instructions.
- Step C: Plug the power adapter into the back of Harmony and plug it in to an ‘always on’ outlet – Harmony is energy efficient and optimized to run 24/7, so do not use an outlet that’s controlled by a switch or electrical timer. Be sure to only use the power adapter provided with Harmony.
- Step D: Turn on your speaker system and increase the master volume in small increments until you reach your desired listening level. Please note that you may need to adjust your speaker volume to match the level you are accustomed to. Due to normal differences between any previous music player and your new Harmony player you may need to try different volume settings. The volume on Harmony is set to 100% from the factory, so adjust your speaker system volumes carefully.
- Place the batteries in the back of the Harmony remote control and attach the tether to both the remote control and the top of the Harmony player where indicated. For more information about the Harmony remote control, see our Remote Control Guide.
- After 1-3 minutes, your music and/or visual content should start to play automatically. If it doesn’t, check your sound system to make sure it’s turned on and/or the volume is up at a hearable level.
Network Setup
Wired Ethernet Setup(Recommended)
If available, the easiest and most reliable way is to connect Harmony to your Internet router using the Ethernet cable included in the box.

- Connect the provided Ethernet cable into the Ethernet port on the back of Harmony and to your internet router.
- Once Harmony is successfully connected to the internet, the Network light will remain solid green. (For advanced setups that require a Static IP address or Proxy, see the WiFi and Advanced Wired Setup below)
- Once Harmony is connected to the internet, the Network light will remain solid green. If your Network light is anything other than green, see the LED Control Guide for troubleshooting.
WiFi and Advanced Wired Setup
You will need to download the Mood Harmony Setup app on the Google Play Store or Apple App Store.
After installing the Mood Harmony Setup app on your mobile device, follow the instructions in the app to get connected. Watch our How to Access Network Settings Video for more information.
Once Harmony is connected to the internet, the Network light will remain solid green.
If your Network light is anything other than green, see the LED Control Guide for troubleshooting.
Optional control via screen/display connected to Harmony through HDMI
Hit the back button on Harmony’s remote control to navigate to Harmony’s main menu.
If you’d like to connect your player via WiFi:
Select the WiFi Menu and enable the “WiFi State”.
You should see a list of available WiFi networks, select your desired network and enter the password (if needed).
Once the player is successfully connected to the WiFi network, the network will show as CONNECTED.
Navigate out of the settings menu and back to the MVision Menu Screen.
If your player is connected to the internet, the Network light will remain solid green.
If your Network light is anything other than green, see the LED Control Guide for troubleshooting.
If you’d like to setup an Advanced Wired Connection:
Select the Ethernet Menu and check that the “Ethernet State” is enabled.
Select “Configure Ethernet Settings”.
From here you can configure the IP Address, Gateway, Netmask, and DNS.
After changing any settings, navigate back to the MVision Menu Screen.
If your player is connected to the internet, the Network light will remain solid green.
If your Network light is anything other than green, see the LED Control Guide for troubleshooting.
Checking Connectivity:
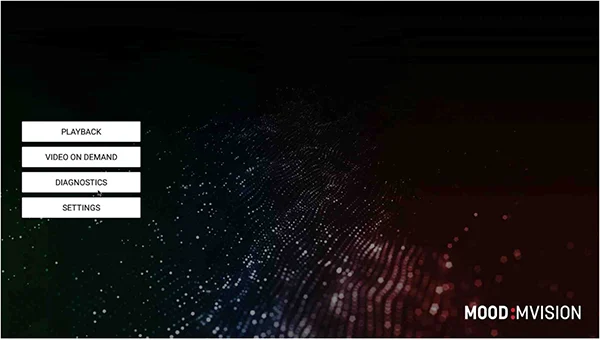
Once you are done setting the network, return to the Home screen using the back button on the remote control and navigate to the DIAGNOSTICS menu to check connectivity.
If everything is connected properly, you’ll see a green Server Connectivity OK message.

Return to the SETTINGS menu in the event your player does not appear to be connecting.
Once everything is set up correctly, select the PLAYBACK button from the Home screen.
Controlling Harmony Music
If you’re an active Harmony Music subscriber, you should have received an email with your account information. Log on to Harmony Music to start customizing your music experience.
Didn’t receive an email from us? Contact us at [email protected] to request your login credentials.
Getting Started with the Harmony Music Control Site
Harmony Music was designed with mobile in mind. The site looks and works great on all modern computers (desktop/laptop), mobile phones, and tablets!
Library: All music content you’ve added or created will be kept here. Clicking the + icon in the top right corner of the screen allows you to: Add existing Mood Core Programs or Create a Mix.
Messaging: Here, you are able to upload and schedule overhead messaging in your business to play at specified times.
Now Playing/Sites: Use this to see your players and what song each player is currently playing. You also have the ability to skip and block unwanted songs, as well as mute and adjust the volume. Heard a song recently and want to know the artist and track name? Clicking on the Recent button will display a list of recently played songs. You can also tune your player to play specific Playlists you’ve created from the Playlists tab.
Tip: If your player is tuned to a Playlist you can use the CH+/CH- buttons on your remote to cycle through the different music in that Playlist!
Playlists: The Playlists tab allows you create a Playlist schedule using any music (Programs/Mixes/Stations) you’ve added to your Music Library. You can also schedule your Music to play at times you specify to custom tailor your music experience.
NOTE: Your Harmony media player will come preloaded with music so once it’s connected to your sound system, you’ll instantly have access to your music!

Related Articles
Satellite Series
Satellite Series Choose your satellite player below to begin. If you have any issues finding which player you have, please contact us.[dsm_breadcrumbs show_home_icon="off" separator_icon="5||divi||400" separator_bg_color="RGBA(255,255,255,0)"...
Content Request Portal
Messaging Content Request[dsm_breadcrumbs show_home_icon="off" separator_icon="5||divi||400" separator_bg_color="RGBA(255,255,255,0)" _builder_version="4.27.2" _module_preset="default" items_text_color="#000000" separators_text_color="#000000"...
ProFusion iS/iH/iO Network update error codes
ProFusion iS/iH/iO Network update error codes[dsm_breadcrumbs show_home_icon="off" separator_icon="5||divi||400" separator_bg_color="RGBA(255,255,255,0)" _builder_version="4.27.2" _module_preset="default" items_text_color="#000000" separators_text_color="#000000"...
CD Update Instructions & Troubleshooting
CD Update Instructions & Troubleshooting[dsm_breadcrumbs show_home_icon="off" separator_icon="5||divi||400" separator_bg_color="RGBA(255,255,255,0)" _builder_version="4.27.2" _module_preset="default" items_text_color="#000000" separators_text_color="#000000"...
ProFusion X/XS
ProFusion X/XS[dsm_breadcrumbs show_home_icon="off" separator_icon="5||divi||400" separator_bg_color="RGBA(255,255,255,0)" _builder_version="4.27.2" _module_preset="default" items_text_color="#000000" separators_text_color="#000000" separators_font_size="12px"...
Getting Started with the Harmony MAVP-B2 Player
Getting Started with the Harmony MAVP-B2 Player[dsm_breadcrumbs show_home_icon="off" separator_icon="5||divi||400" separator_bg_color="RGBA(255,255,255,0)" _builder_version="4.27.2" _module_preset="default" items_text_color="#000000"...
How to reboot your player
How to reboot your player[dsm_breadcrumbs show_home_icon="off" separator_icon="5||divi||400" separator_bg_color="RGBA(255,255,255,0)" _builder_version="4.27.2" _module_preset="default" items_text_color="#000000" separators_text_color="#000000"...
Welcome to Harmony
Welcome to Harmony[dsm_breadcrumbs show_home_icon="off" separator_icon="5||divi||400" separator_bg_color="RGBA(255,255,255,0)" _builder_version="4.27.2" _module_preset="default" items_text_color="#000000" separators_text_color="#000000"...
Player screen reads incorrect date / set date and time
Player screen reads incorrect date / set date and time[dsm_breadcrumbs show_home_icon="off" separator_icon="5||divi||400" separator_bg_color="RGBA(255,255,255,0)" _builder_version="4.27.2" _module_preset="default" items_text_color="#000000"...
Player screen displays “Error code: 28” or “NIF Lock”
Player screen displays "Error code: 28" or "NIF Lock"[dsm_breadcrumbs show_home_icon="off" separator_icon="5||divi||400" separator_bg_color="RGBA(255,255,255,0)" _builder_version="4.27.2" _module_preset="default" items_text_color="#000000"...